Integrate Subscriptions
Last updated: Feb 27th, 8:13am
Integrate subscriptions to bill customers at regular intervals.
Know before you code
RequiredYou need the following to use this integration:
- This integration is available to select partners only.
- Complete Onboarding.
- Follow the instructions in Get started to get your access token.
- You'll need your build notation (BN) code. If you don't have it, contact your PayPal account manager.
- Indian Rupees (INR) are not supported in subscriptions.
RequiredYou'll need both client side and server side tools
This client-side and server-side integration uses the following:
- Catalog Products REST API: Creates goods or services for customers to subscribe to.
- Subscriptions REST API: Creates a recurring payment plan.
- PayPal JavaScript SDK: Creates a payment button.
OptionalExplore PayPal APIs with Postman
Use Postman to explore and test PayPal APIs. Learn more in our Postman guide
Generate PayPal-Auth-Assertion header
Pass the PayPal-Auth-Assertion header with the standard Content-Type, Authorization, and PayPal-Request-IDheaders. The value of the PayPal-Auth-Assertion header can be generated as follows:
1// client-side JavaScript23function encodeObjectToBase64(object) {4 const objectString = JSON.stringify(object);5 return window.btoa(objectString);6}78const clientId = "CLIENT-ID";9const sellerPayerId = "SELLER-PAYER-ID"; // preferred10// const sellerEmail = "SELLER-ACCOUNT-EMAIL"; // use instead of payer-id if required1112const header = {13 alg: "none"14};15const encodedHeader = encodeObjectToBase64(header);1617const payload = {18 iss: clientId,19 payer_id: sellerPayerId20 // email: sellerEmail21};22const encodedPayload = encodeObjectToBase64(payload);2324const jwt =\`${encodedHeader}.${encodedPayload}.\`; // json web token25console.log(\`Paypal-Auth-Assertion=${jwt}\`);
Note: The token contains two period (.) characters, which are required according to the JSON web token structure.
Modify the code
- Use the client ID of the platform or marketplace from the PayPal Developer dashboard for
clientID. - The
sellerPayerIdis the payer ID of the receiving seller's PayPal account. You can also useemailinstead ofpayer_idand supply the email address of the seller's PayPal account.
Example functions to generate the PayPal-Auth-Assertion header in other programming environments:
Node.js
1// Node.js23function encodeObjectToBase64(object) {4 const objectString = JSON.stringify(object);5 return Buffer6 .from(objectString)7 .toString("base64");8}910const clientId = "CLIENT-ID";11const sellerPayerId = "SELLER-PAYER-ID"; // preferred12// const sellerEmail = "SELLER-ACCOUNT-EMAIL"; // use instead if payer-id unknown\n13const header = {14 alg: "none"15};16const encodedHeader = encodeObjectToBase64(header);1718const payload = {19 iss: clientId,20 payer_id: sellerPayerId21 // email: sellerEmail22};23const encodedPayload = encodeObjectToBase64(payload);2425const jwt = \`${encodedHeader}.${encodedPayload}.\`; // json web token26console.log(\`Paypal-Auth-Assertion=${jwt}\`);
Java
1// Java23import org.apache.commons.codec.binary.Base64;45public class Base64Encode {67 public static void main(String[] args) {8 String clientId = "CLIENT-ID";9 String sellerPayerId = "SELLER-PAYER-ID"; // preferred10 // String sellerEmail = "SELLER-ACCOUNT-EMAIL"; // use instead if payer-id unknown\n11 String header = "{\\"alg\\":\\"none\\"}";12 String payload =13 "{\\"iss\\":\\"" + clientId + "\\",\\"payer_id\\":\\"" + sellerPayerId + "\\"}";14 // "{\"iss\":\"" + clientId + "\",\"email\":\"" + sellerEmail + "\"}";\n15 byte[] encodedHeader = Base64.encodeBase64(header.getBytes());16 byte[] encodedPayload = Base64.encodeBase64(payload.getBytes());\n17 String jwt = new String(encodedHeader) +18 "." +19 new String(encodedPayload) +20 "."; // json web token21 System.out.println("Paypal-Auth-Assertion=" + jwt);22 }23}
For more information about request headers, see HTTP request headers.
Create product
To create a product for your subscription plan, copy and modify the following code:
Sample request
API endpoint used: Create product
1curl -v -X POST https://api-m.sandbox.paypal.com/v1/catalogs/products -H "Content-Type: application/json" -H "Authorization: Bearer ACCESS-TOKEN" -H "PayPal-Request-Id: REQUEST-ID" -H "PayPal-Auth-Assertion: AUTH-ASSERTION" -d '{2 "name": "Video Streaming Service",3 "description": "A video streaming service",4 "type": "SERVICE",5 "category": "SOFTWARE",6 "image_url": "https://example.com/streaming.jpg",7 "home_url": "https://example.com/home"8 }'
Modify the code
After you copy the code in the sample request, modify the following:
- Change
ACCESS-TOKENto your access token. - Replace
REQUEST-IDwith a unique ID that you generate. This ID helps prevent duplicate requests if the API call is disrupted.
- Change the
AUTH-ASSERTIONheader to your JSON Web Token (JWT) assertion that identifies your seller. For more information on how to create a JWT, seePayPal-Auth-Assertion.
- Optional: Change parameters such as the
nameanddescriptionto represent your product.
Step result
A successful request results in the following:
- The HTTP status code
201 Created.
- A JSON response body that contains an
idfor the product. Use this ID to complete other actions through the REST API, such as creating a subscription plan.
Sample response
1{2 "id": "PROD-5FD60555F23244316",3 "name": "Video Streaming Service",4 "description": "A video streaming service",5 "create_time": "2020-01-21T16:04:39Z",6 "links": [7 {8 "href": "https://api-m.sandbox.paypal.com/v1/catalogs/products/PROD-5FD60555F23244316",9 "rel": "self",10 "method": "GET"11 },12 {13 "href": "https://api-m.sandbox.paypal.com/v1/catalogs/products/PROD-5FD60555F23244316",14 "rel": "edit",15 "method": "PATCH"16 }17 ]18}
Create subscription plan
The following sample request is an example of a subscription plan. Modify the code to fit your subscription model.
Review the following topics to help understand how to modify the code for your use case:
Sample request
This sample request creates a subscription plan that:
- Has a 1-month free trial and continues as a 12-month, fixed-price subscription
- Includes a $10 USD setup fee
- Bills any outstanding balance at the next billing cycle
- Allows the subscription to continue if the initial payment for the setup fails
- Suspends the subscription after 3 consecutive payment failures
- Includes a 10% tax in the billing amount
Important: Only one currency_code is allowed per subscription plan. Make a new subscription plan to offer a subscription in another currency.
API endpoint used: Create plan
1curl -v -k -X POST https://api-m.sandbox.paypal.com/v1/billing/plans -H "Accept: application/json" -H "Authorization: Bearer <Access-Token>" -H "PayPal-Request-Id: 123e4567-e89b-12d3-a456-426655440020" -H "PayPal-Auth-Assertion: eyJhbGciOiJub25lIn0.eyJpc3MiOiJjbGllbnRfaWQiLCJlbWFpbCI6Im15LWVtYWlsQGV4YW1wbGUuY29tIn0." -d '{2 "product_id": "PROD-5FD60555F23244316",3 "name": "Basic Plan",4 "description": "Basic plan",5 "billing_cycles": [6 {7 "frequency": {8 "interval_unit": "MONTH",9 "interval_count": 110 },11 "tenure_type": "TRIAL",12 "sequence": 1,13 "total_cycles": 114 },15 {16 "frequency": {17 "interval_unit": "MONTH",18 "interval_count": 119 },20 "tenure_type": "REGULAR",21 "sequence": 2,22 "total_cycles": 12,23 "pricing_scheme": {24 "fixed_price": {25 "value": "10",26 "currency_code": "USD"27 }28 }29 }30 ],31 "payment_preferences": {32 "auto_bill_outstanding": true,33 "setup_fee": {34 "value": "10",35 "currency_code": "USD"36 },37 "setup_fee_failure_action": "CONTINUE",38 "payment_failure_threshold": 339 },40 "taxes": {41 "percentage": "10",42 "inclusive": false43 }44 }'
Modify the code
After you copy the code in the sample request, modify the following:
- Change
ACCESS-TOKENto your access token. - Replace
REQUEST-IDwith a unique ID that you generate. This ID helps prevent duplicate requests if the API call is disrupted.
- Change the
AUTH-ASSERTIONheader to your JSON Web Token (JWT) assertion that identifies your seller. For more information on how to create a JWT, seePayPal-Auth-Assertion.
- Change the value of the
product_idparameter to the ID returned when you created the product. - (Optional) Change or add parameters in the Create plan request body to create a plan that meets your business needs. Some examples:
- Fixed pricing plans
- User or seat-based pricing plans
- Free or discounted trials
Step result
A successful request results in the following:
- The HTTP status code
201 Created.
- A JSON response body containing an
idfor the subscription plan. Use the subscription plan ID to complete other actions through the REST API, such as editing or deactivating the plan. - A subscription plan in the seller's PayPal account in the
Onstatus.
Sample response
To see how the result of this API call looks in the seller's account, use your sandbox business account credentials to log in to https://www.sandbox.paypal.com/billing/plans. The subscription plan reflects the plan nu
1{2 "id": "P-17M15335A8501272JLXLLNKI",3 "product_id": "PROD-5FD60555F23244316",4 "name": "Basic Plan",5 "status": "ACTIVE",6 "description": "Basic plan",7 "create_time": "2020-01-21T16:09:13Z",8 "links": [9 {10 "href": "https://api-m.sandbox.paypal.com/v1/billing/plans/P-17M15335A8501272JLXLLNKI",11 "rel": "self",12 "method": "GET"13 },14 {15 "href": "https://api-m.sandbox.paypal.com/v1/billing/plans/P-17M15335A8501272JLXLLNKI",16 "rel": "edit",17 "method": "PATCH"18 },19 {20 "href": "https://api-m.sandbox.paypal.com/v1/billing/plans/P-17M15335A8501272JLXLLNKI/deactivate",21 "rel": "self",22 "method": "POST"23 }24 ]25}
Create subscription
1curl -v -X POST https://api-m.sandbox.paypal.com/v1/billing/subscriptions \2 -H "Content-Type: application/json" \3 -H "Authorization: Bearer <Access-Token>" \4 -H "PayPal-Partner-Attribution-Id: Example_Marketplace" \5 -H "PayPal-Request-Id: 123e4567-e89b-12d3-a456-426655440020" \6 -H "PayPal-Auth-Assertion: eyJhbGciOiJub25lIn0.eyJpc3MiOiJjbGllbnRfaWQiLCJlbWFpbCI6Im15LWVtYWlsQGV4YW1wbGUuY29tIn0." \7 -d '{8 "plan_id": "P-17M15335A8501272JLXLLNKI",9 "start_time": "2020-01-22T00:00:00Z",10 "quantity": "20",11 "shipping_amount": {12 "currency_code": "USD",13 "value": "10.00"14 },15 "subscriber": {16 "name": {17 "given_name": "John",18 "surname": "Doe"19 },20 "email_address": "customer@example.com",21 "shipping_address": {22 "name": {23 "full_name": "John Doe"24 },25 "address": {26 "address_line_1": "2211 N First Street",27 "address_line_2": "Building 17",28 "admin_area_2": "San Jose",29 "admin_area_1": "CA",30 "postal_code": "95131",31 "country_code": "US"32 }33 }34 },35 "application_context": {36 "brand_name": "example-retail",37 "locale": "en-US",38 "shipping_preference": "SET_PROVIDED_ADDRESS",39 "user_action": "SUBSCRIBE_NOW",40 "payment_method": {41 "payer_selected": "PAYPAL",42 "payee_preferred": "IMMEDIATE_PAYMENT_REQUIRED"43 },44 "return_url": "https://example.com/returnUrl",45 "cancel_url": "https://example.com/cancelUrl"46 }47 }'
Modify the code
After you copy the code in the sample request, modify the following:
- Change
Access-Tokento your access token. - Replace the value for the
PayPal-Partner-Attribution-Idto your BN code. - Replace the sample ID for
PayPal-Request-Idwith a unique ID you generate. This ID helps prevent creating duplicate products in the event that the API call is disrupted. See also: API Idempotency. - Replace the
PayPal-Auth-Assertionheader with your own JSON Web Token (JWT) assertion that identifies your seller. For more information on how to create a JWT, seePayPal-Auth-Assertion. - Determine the value for
subscriber/shipping_address:- If you don't need to ship your services, set
application_context/shipping_preferencetoNO_SHIPPING. This hides shipping information fields on the PayPal Review page. - If the buyer entered a shipping address on the seller's site, pass the shipping address to PayPal here.
- If the buyer didn't enter a shipping address on the seller's site, you can edit the shipping address on the PayPal Review page. Leave
application_context/shipping preferenceblank or set it toGET_FROM_FILE.
- If you don't need to ship your services, set
- (Optional) Use the
application_context/user_actionfield to automatically activate subscriptions. Set the field toSUBSCRIBE_NOWor send it empty. The default value isSUBSCRIBE_NOW. Otherwise, you need to make aPOST v1/billing/subscriptions/{ID}/activatecall to activate the subscription.
Sample response
1{2 "id": "I-BW452GLLEP1G",3 "status": "APPROVAL_PENDING",4 "status_update_time": "2018-12-10T21:20:49Z",5 "plan_id": "P-17M15335A8501272JLXLLNKI",6 "start_time": "2020-01-22T00:00:00Z",7 "quantity": "20",8 "shipping_amount": {9 "currency_code": "USD",10 "value": "10.00"11 },12 "subscriber": {13 "name": {14 "given_name": "John",15 "surname": "Doe"16 },17 "email_address": "customer@example.com",18 "payer_id": "2J6QB8YJQSJRJ",19 "shipping_address": {20 "name": {21 "full_name": "John Doe"22 },23 "address": {24 "address_line_1": "2211 N First Street",25 "address_line_2": "Building 17",26 "admin_area_2": "San Jose",27 "admin_area_1": "CA",28 "postal_code": "95131",29 "country_code": "US"30 }31 }32 },33 "create_time": "2018-12-10T21:20:49Z",34 "links": [35 {36 "href": "https://www.paypal.com/webapps/billing/subscriptions?ba_token=BA-2M539689T3856352J",37 "rel": "approve",38 "method": "GET"39 },40 {41 "href": "https://api-m.paypal.com/v1/billing/subscriptions/I-BW452GLLEP1G",42 "rel": "edit",43 "method": "PATCH"44 },45 {46 "href": "https://api-m.paypal.com/v1/billing/subscriptions/I-BW452GLLEP1G",47 "rel": "self",48 "method": "GET"49 }50 ]51}
Step result
- A return status code of HTTP
201 Created. - A JSON response body that contains an ID for the subscription. You can use this ID to complete other actions through the REST API, such as updating the subscription.
- Save the Subscription ID returned in the
idfield of the API response. - (Optional) Change or add other parameters to customize the subscription plan. Refer to Capabilities to learn more about how you can customize the plan.
Create button
To start a subscription from your website, add the PayPal JavaScript SDK code and modify it. This code adds buttons to your website so your buyers can use PayPal or a debit or credit card.
Add and modify the code
- Copy and paste this code into webpage to create the buttons. When your buyer selects a button, they are directed to PayPal to complete subscription agreement and payment.
1<!DOCTYPE html>2<head>3 <meta name="viewport" content="width=device-width, initial-scale=1"> <!-- Ensures optimal rendering on mobile devices. -->4</head>5<body>6 <script src="https://www.paypal.com/sdk/js?client-id=YOUR_CLIENT_ID&vault=true&intent=subscription">7 </script> // Add your client_id8 <div id="paypal-button-container"></div>9 <script>10 paypal.Buttons({11 createSubscription: function(data, actions) {12 return actions.subscription.create({13 'plan_id': 'YOUR_PLAN_ID' // Creates the subscription14 });15 },16 onApprove: function(data, actions) {17 alert('You have successfully subscribed to ' + data.subscriptionID); // Optional message given to subscriber18 }19 }).render('#paypal-button-container'); // Renders the PayPal button20 </script>21 </body>22</html>
2. Modify the code as follows:
- Change
YOUR_CLIENT_IDto your client ID. - Change
YOUR_PLAN_IDto the plan ID returned from the Create Plan API call.
3. Load the webpage to see the payment buttons:

Tip: To render more than one button on a single webpage, see Multiple subscribe buttons for your website.
Test flow
Test a transaction to see the subscription created in the merchant account:
Test the transaction as a buyer
- Select the PayPal button on the page.
- Use the sandbox personal login information from the Developer Dashboard to log in and simulate the buyer making a purchase.
- In the Checkout window, make a note of the purchase amount in the upper right corner. USD is the default currency. You can customize the JavaScript SDK by adding a different currency code
Availability: The JavaScript SDK onShippingChange, onShippingAddressChange, and onShippingOptionsChange functions are not compatible with Subscriptions.
- Select the arrow next to the purchase amount to view the subscription details:
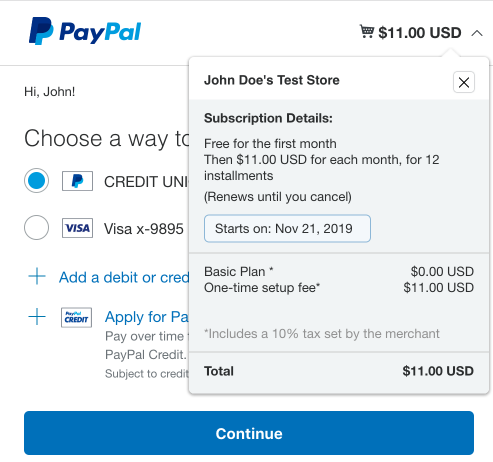
- Select the test credit card as the payment method and select Continue.
- Select Agree & Subscribe to agree to the terms of the subscription.
Confirm the movement of funds from the buyer account
- Use the sandbox personal account you used to complete the purchase to log in to https://www.sandbox.paypal.com/myaccount/autopay/connect/.
- Confirm the subscription appears in the active automatic payment list. Select the active automatic payment to see the details of the subscription.
- Log out of the account.
Confirm the movement of funds to the merchant account
- Use the sandbox business account information from the Developer Dashboard to log in tohttps://www.sandbox.paypal.com/billing/subscriptions.
- Confirm the subscription made by the test buyer appears on the Subscriptions tab. Select the subscription to see the details of the subscription.
- Log out of the account.
Next steps & customizations
RequiredTest and go live with your subscription integration
You can run negative tests on your integration to manage the responses you give to your customers.
See also
- Catalog Products REST API and Subscriptions REST API - Use these APIs to add actions to your integration, such as updating the product description, editing the plan or subscription, deactivating the plan or subscription, and more.
- Subscriptions webhook events - Use webhooks to handle tasks triggered by subscription actions.