Transactions
Email Receipts
For information about how to alert customers when subscription payments fail, see our article on email notifications instead.
Your Braintree gateway can be configured to send email receipts to your customers for every transaction or refund that you successfully submit for settlement.
To use this feature, you must:
- Enable email receipts in the Control Panel
- Include an email address in the customer information for all transactions created – both in the Control Panel or via the API
Braintree's email receipts can include a line of custom text, but can't otherwise be altered. If you want to customize the delivery or content of your receipts, it’s best to create and send your own.
PayPal email receipts
PayPal sends receipts to its customers for PayPal transactions by default. If you are using Braintree’s email receipts, PayPal customers will receive two receipts: one from Braintree and one from PayPal.
Enabling email receipts
Before you can enable this feature, you must:
- Configure your SPF records to give us permission to send receipts on your behalf
- Have the authorized signer on your account contact us, requesting that this feature be activated
After you’ve received confirmation from our Support team, enable email receipts in the Control Panel:
- Log into the Control Panel
- Click on the gear icon in the top right corner
- Click Processing from the drop-down menu
- Scroll to the Transactions section
- Next to Email Receipts, click the Options link
- Check the box next to Enabled
- Configure your settings
- Click the Save button
Configuration options
On the Edit Receipt Options page where you enabled this feature, you can also personalize the email receipts for your business:
- Send Receipt by Default?: With this box checked, receipts will be sent to customers for every successful transaction
If you choose to enable this option, you will need to either specify an email address when creating each transaction or ensure each customer in your Vault has an associated email address. Transactions submitted for customers that do not have an email address will trigger a validation error.
- Sender Email Address: All transaction receipt emails will be sent from no-reply@braintreegateway.com.
- Reply To: This is the email your customers will use if they need to contact you after their purchase.
- BCC: This allows you to send copies of all receipts to yourself (e.g. receipt-archive@mydomain.com); this email address will not be visible to customers.
- Email Text: Custom plain text that will appear at the top of every receipt, limited to a maximum of 1000 characters.
The Email text field does not support HTML markup and must be written as plain text. If you want to send fully customized email receipts, you'll need to create and send your own.
Authorized signer
The authorized signer for your Braintree account is the only person who can request access or make changes to sensitive account information, such as transaction details, bank account information, or statement descriptors. This individual and their associated authorized email address were determined during the application process.
Authorized signers are not the same as the Account Admin user role in the Control Panel, and can't be managed via the Control Panel; to change your authorized signer or add additional signers, Contact us.
If an authorized signer calls in to request information about their account, they will need to answer specific security questions to confirm their identity.
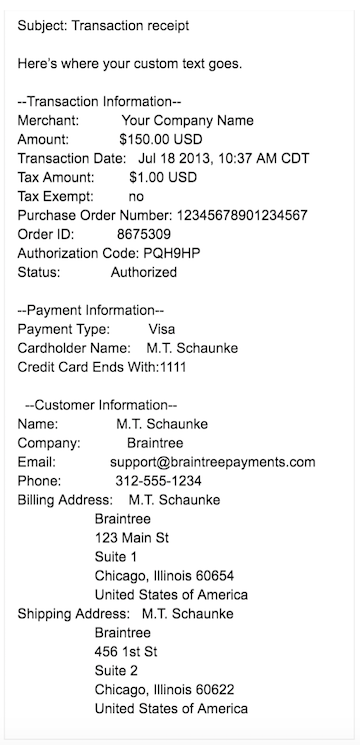
Sample email receipt
All possible transaction fields are shown in the sample below. If you are not utilizing some of these fields (e.g. Order ID), they will not appear on your customers’ receipts. Custom fields will not appear on receipts, either.

Sending an email receipt manually
If you need to manually generate a receipt for a transaction, you can do so on the Transaction Details page. You'll find a Receipt button at the top of that page.
If you collected the customer's email address during the transaction, the address will populate automatically.
Sending your own email receipts
In order to send your own custom email receipts, you’ll need to work with your developers to set up custom logic on your end.
To generate a useful receipt, you’ll need to retrieve the transaction details from the result object via the API. For recurring billing transactions, you’ll need to search for the transaction details. Once you have this information, use your custom logic to generate and distribute the receipt.
If you create your own custom receipts, you should never display the card's expiration date or any more than the last 5 digits of the credit card number.